TABLE OF CONTENTS
-
Introduction
-
Block Diagram
-
Methodology
-
Aurduino IDE
-
DHT SENSOR
-
SOIL MOISTURE SENSOR
-
RESULT AND CONCLUSION
-
FUTURE SCOPE
-
CODE
-
REFERENCE
ABSTRACT
The Nursery monitoring system has recently attracted tremendous interest due to the potential application in emerging technology. More importantly, this technique is used to enhance the performance of existing techniques or to develop and design
new techniques for the growth of plants. The Nursery monitoring system is helpful for watering the plants and to monitor few parameters for growth of plants like temperature and humidity.
This system is very used in nursery farms and also in agricultural fields to monitor the changes in environment. In this system a mechanism is established to find the moisture content in the soil with the help of soil moisture sensor and
depending
upon the condition of the sensor the water is controlled,and also temperature of the surrounding is measured with the help of DHT11 sensor and depending on the conditions the fan is turned on and off.
This helps in providing the appropriate amount of water for plants so reduces some situations like mud cracks, water logging. This helps in irrigating the field even during night time, so does not require the farmer to switch ON the motor
manually,
they can directly control the motor even from the far places ,this reduces the risk of farmer’s and they don’t find it necessary to be their at field for switching on motor ,it can be even done from anywhere
This method can be used at places where their is scarcity of water ,this method reduces the water loss ,as it send the alert to the certain person so that he automatically turn off the motor using phone ,instead of coming to field and turning it
off manually.
INTRODUCTION
Agriculture is Backbone of our country which play a prominent role in our country’s economy,Since decade economy from agricultural sector has experienced a downfall due to decrease in the yield percentage and it may cost the farmers life due to
less returns.
We can notice that in our country more number of farmers are commiting suicide as they are not getting proper returns for their efforts,this will stop the others to step ahead in farming.
This results in hunger and poverty.
Inorder to have better yield and the farmers are heading towards nursery,where crops are raised till certain age by providing proper nourishment later taken to outer field for further growth. In nursery we can get perfect nourishment at younger
age
but it is important to maintain required atmosphere in nursery .
It requires Skilled Labour to look over the nursery,where they have to check every conditions around the plants and monitor the changes waters and act accordingly.
Currently, there is need for a modernized approach.in this method we make use of technology to monitor the temperature of surrounding and moisture content without involving labour.
This can surely help us to overcome these problems we are facing currently,It don’t require labour to monitor the changes and it is programmed to act automatically.
We make use of dht11 sensor and soil moisture sensor which play a vital role in nursery monitoring system,it is programmed to get the readings according to changes in nursery.
It alerts the owner or certain person in nursery about the changes in nursery environment.
The Arduino ide which is a cheap, flexible, fully customizable and programmable small computer board brings the advantages of a PC to the domain of sensor network. In our system we are measuring Nursery environment ( temperature,moisture value )
with different available sensors. These sensor’s collected data i.e. biometric information is given to Arduino ide and then it is transferred to server.
�
Block Diagram
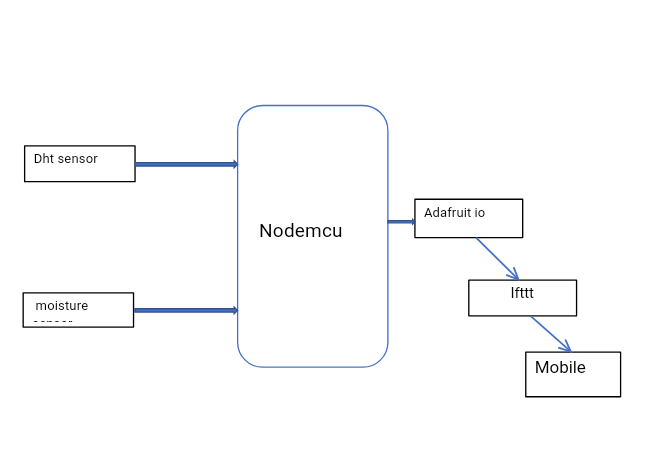
Methodology
In this project we have temperature and soil moisture content readings of the patient which are monitored using arduino ide. These sensors signals are send to Arduino IDE via amplifier circuit and signal conditioning unit (scu), because the
signals
level are low (gain), so amplifier circuit is used to gain up the signal and transmit the signals to the Arduino IDE. Arduino IDE is a Linux based operating system works as a small pc processor system. Here temperature and soil moisture value is
measured using respective sensors and it can be monitored in the screen of mobile using Arduino IDE as well as monitoring through anywhere in the world using internet source.
The proposed method of nursery monitoring system monitors temperature and moisture parameters using Arduino IDE. After connecting internet to the Arduino IDE it acts as a 3can monitor the patient’s health status anywhere in the world using
laptops,
tablets and smart phones. If these parameters goes abnormal it will automatically sends alert SMS to the doctors and relatives.
Hardware requirements:
-
Aurduino IDE
-
DHT sensor
-
Soil moisture Sensor
-
Node mcu
Software requirements :
ARDUINO IDE
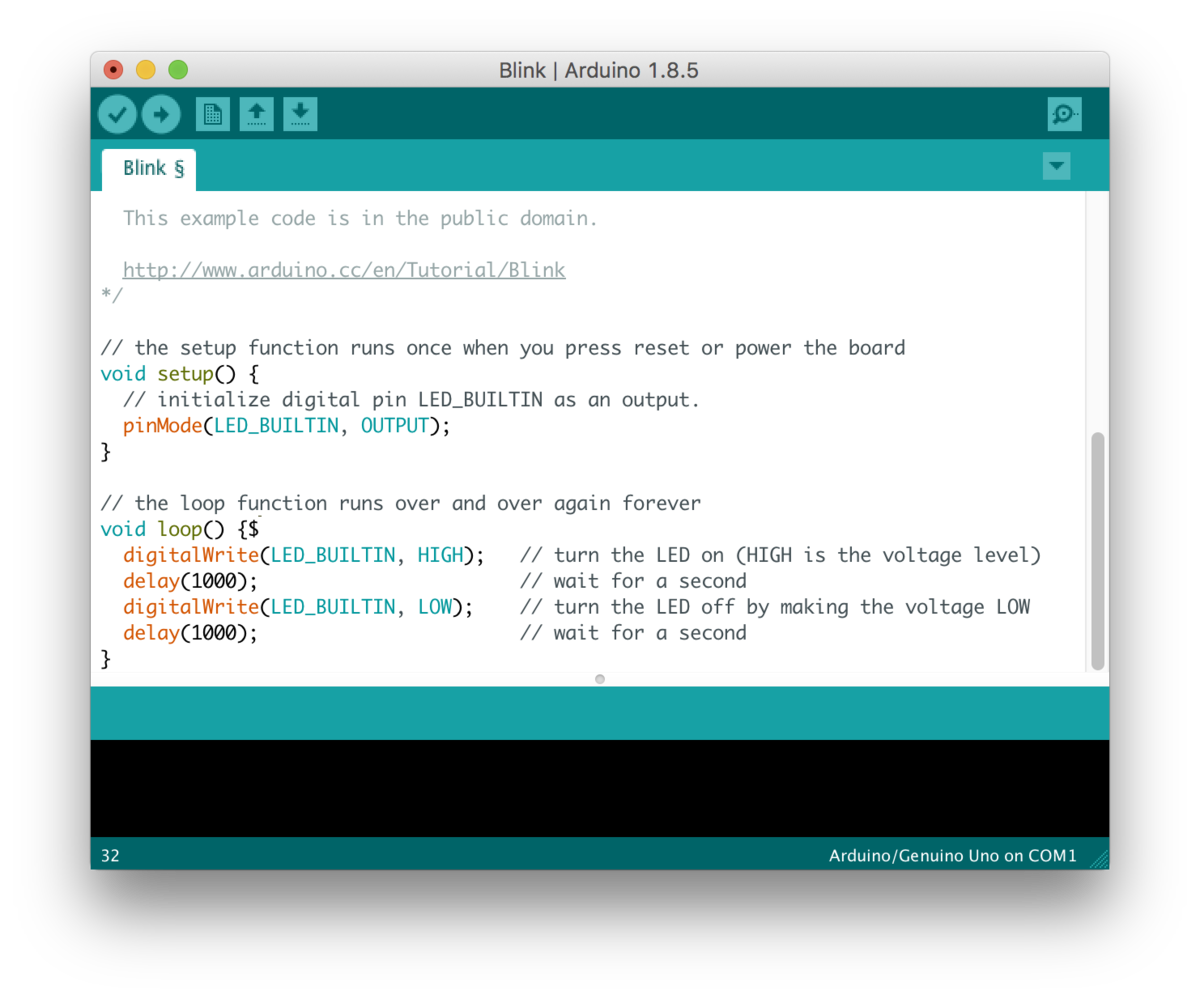 Arduino IDE is an open source software that is mainly used for writing and compiling the code into the Arduino Module. It is an official Arduino software, making code compilation too easy that even a common person with no prior technical
knowledge can get their feet wet with the learning process. It is easily available for operating systems like MAC, Windows, and Linux and runs on the Java Platform that comes with inbuilt functions and commands that play a vital role for
debugging,
editing and compiling the code in the environment.
A range of Arduino modules available including Arduino Uno, Arduino Mega, Arduino Leonardo, Arduino Micro and many more. Each of them contains a microcontroller on the board that is actually programmed and accepts the information in the form of
code. The main code, also known as a sketch, created on the IDE platform will ultimately generate a Hex File which is then transferred and uploaded in the controller on the board.
Arduino IDE is an open source software that is mainly used for writing and compiling the code into the Arduino Module. It is an official Arduino software, making code compilation too easy that even a common person with no prior technical
knowledge can get their feet wet with the learning process. It is easily available for operating systems like MAC, Windows, and Linux and runs on the Java Platform that comes with inbuilt functions and commands that play a vital role for
debugging,
editing and compiling the code in the environment.
A range of Arduino modules available including Arduino Uno, Arduino Mega, Arduino Leonardo, Arduino Micro and many more. Each of them contains a microcontroller on the board that is actually programmed and accepts the information in the form of
code. The main code, also known as a sketch, created on the IDE platform will ultimately generate a Hex File which is then transferred and uploaded in the controller on the board.
DHT SENSOR

-
DHT11 Specifications:
-
Operating Voltage: 3.5V to 5.5v.
-
Operating current: 0.3mA (measuring) 60uA (standby)
-
Output: Serial data.
-
Temperature Range: 0°C to 50°C.
-
Humidity Range: 20% to 90%
-
Resolution: Temperature and Humidity both are 16-bit.
Pin Configuration
|
Pin Number
|
Pin Name
|
Wire Colour
|
Description
|
|
1.
|
Ground
|
Black
|
Connected to the ground of the system.
|
|
2.
|
Vcc
|
Red
|
Connect to +5V or +3.3V supply voltage
|
|
3.
|
Signal
|
Purple
|
Pulsating output signal.
|
-
Ground Black Connected to the ground of the system
-
Vcc Red Connect to +5V or +3.3V supply voltage
-
Signal Purple Pulsating output signal.
How Dht sensor works ?
DHT11 is a low-cost digital sensor for sensing temperature and humidity. This sensor can be easily interfaced with any micro-controller such as Arduino, Raspberry Pi etc… to measure humidity and temperature instantaneously.
DHT11 humidity and temperature sensor is available as a sensor and as a module. The difference between this sensor and module is the pull-up resistor and a power-on LED. DHT11 is a relative humidity sensor. To measure the surrounding air this
sensor uses a thermistor and a capacitive humidity sensor.
DHT11 sensor consists of a capacitive humidity sensing element and a thermistor for sensing temperature. The humidity sensing capacitor has two electrodes with a moisture holding substrate as a dielectric between them. Change in the capacitance
value occurs with the change in humidity levels. The IC measure, process this changed resistance values and change them into digital form.
For measuring temperature this sensor uses a Negative Temperature coefficient thermistor, whi n for the smallest change in temperature, this sensor is usually made up of semiconductor ceramics or polymers.
Connecting NodeMCU to Arduino
-
Pin1 Of DHT11 goes into +3v of NodeMCU
-
Pin2 Of DHT11 goes into Digital pin D4 of NodeMCU
-
Pin3 Of DHT11 goes into Ground Pin (GND) of NodeMCU
Applications of NodeMCU
-
Nursery monitoring system
-
Temperature monitoring in surrounding.
-
Can be used in home automation like turning on fan automatically.
SOIL MOISTURE SENSOR
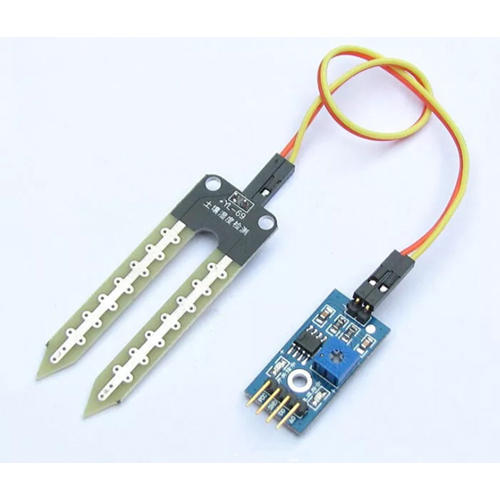
Soil moisture sensors measure the volumetric water content in soil.Since the direct gravimetric measurement of free soil moisture requires removing, drying, and weighing of a sample, soil moisture sensors measure the volumetric water content
indirectly by using some other property of the soil, such as electrical resistance, dielectric constant, or interaction with neutrons, as a proxy for the moisture content.
The relation between the measured property and soil moisture must be calibrated and may vary depending on environmental factors such as soil type, temperature, or electric conductivity. Reflected microwave radiation is affected by the soil
moisture
and is used for remote sensing in hydrology and agriculture. Portable probe instruments can be used by farmers or gardeners.
Soil moisture sensors typically refer to sensors that estimate volumetric water content. Another class of sensors measure another property of moisture in soils called water potential; these sensors are usually referred to as soil water potential
sensors and include tensiometers and gypsum blocks.
How it Works?
This sensor mainly utilizes capacitance to gauge the water content of the soil (dielectric permittivity). The working of this sensor can be done by inserting this sensor into the earth and the status of the water content in the soil can be
reported
in the form of a percent.
Connections To NodeMCU
-
VCC pin is used for power
-
A0 pin is an analog output
-
D0 pin is a digital output
-
GND pin is a Ground
Specifications
-
The required voltage for working is 5V
-
The required current for working is lessthan 20mA
-
Type of interface is analog
-
The required working temperature of this sensor is 10°C~30°C
CONCLUSION
As Agricultural sector is important part of our society, automating these services lessen the burden on humans and eases the measuring process. Also the transparency of this system helps farmers to trust it. When threshold value is
reached, the alarm system that consists of buzzer and LED alerts the person and he can act more quickly o. The objective of developing monitoring systems is to reduce labour cost and helps in getting proper growth at younger age with all
required
nourishment’s. The GSM technology helps the server to update the plant on website. Many further improvements can be made in our system to make it better and easily adaptable such as adding more advanced sensors.the temperature and soil moisture
is read and updated to ADAFRUIT, it is the online server which is connected to IFTTT and also ADAFRUIT is also used to monitor the changes on the server. IFTTT sends the alert to the certain person through SMS,EMAIL etc.. about the changes in
environment . We can make use of Google Assistant to give the command to control the FAN and MOTOR. this results in effective measure of the environmental changes and we can overcome that problems even being away from the nursery.
FUTURE SCOPE
According to the availability of sensors or development in Agricultural trend more parameter can be sensed and monitored which will drastically improve the efficiency of the wireless monitoring system in this field. A graphical LCD can be used
to display a graph of rate of change of parameters over time. The whole Nursery monitoring system which we have framed can be integrated into a small compact unit as small as a cell phone or a wrist watch. This will help us to place this in
nursery as it don’t require more space.
CODE
#include < ESP8266WiFi . h>
#include "Adafruit_MQTT.h"
#include "Adafruit_MQTT_Client.h"
#include "DHT.h"
/************************* WiFi Access Point *********************************/
#define DHTPIN D4
#define DHTTYPE DHT11
#define WLAN_SSID "Bhavana"
#define WLAN_PASS "1234567890"
/************************* Adafruit.io Setup *********************************/
#define AIO_SERVER "io.adafruit.com"
#define AIO_SERVERPORT 1883 // use 8883 for SSL
#define AIO_USERNAME "BHAVANA A"
#define AIO_KEY "aio_VLIQ425lW2saOAPOGnAI6ZvGPkJz"
DHT dht(DHTPIN,DHTTYPE);
int sensorpin=A0;
int sensorvalue;
/************ Global State (you don't need to change this!) ******************/
WiFiClient client;
Adafruit_MQTT_Client mqtt(& client, AIO_SERVER, AIO_SERVERPORT, AIO_USERNAME, AIO_KEY);
/****************************** Feeds ***************************************/
Adafruit_MQTT_Publish temperature = Adafruit_MQTT_Publish(&mqtt, AIO_USERNAME "/feeds/temperature");
Adafruit_MQTT_Publish humidity= Adafruit_MQTT_Publish(&mqtt, AIO_USERNAME "/feeds/humidity");
Adafruit_MQTT_Publish moisture= Adafruit_MQTT_Publish(&mqtt, AIO_USERNAME "/feeds/Mois");
Adafruit_MQTT_Publish mswitch= Adafruit_MQTT_Publish(&mqtt, AIO_USERNAME "/feeds/MSWITCH");
Adafruit_MQTT_Publish tswitch= Adafruit_MQTT_Publish(&mqtt, AIO_USERNAME "/feeds/TSWITCH");
//float temperature=0;
//float humidity=0;
// Setup a feed called 'onoff' for subscribing to changes.
Adafruit_MQTT_Subscribe FAN = Adafruit_MQTT_Subscribe(&mqtt, AIO_USERNAME "/feeds/FAN");
Adafruit_MQTT_Subscribe MOTOR = Adafruit_MQTT_Subscribe(&mqtt, AIO_USERNAME "/feeds/MOTOR");
/*************************** Sketch Code ************************************/
// Bug workaround for Arduino 1.6.6, it seems to need a function declaration
// for some reason (only affects ESP8266, likely an arduino-builder bug).
void MQTT_connect();
void setup() {
Serial.begin(115200);
delay(10);
dht.begin();
Serial.println(F("Adafruit MQTT demo"));
// Connect to WiFi access point.
Serial.println(); Serial.println();
Serial.print("Connecting to ");
Serial.println(WLAN_SSID);
WiFi.begin(WLAN_SSID, WLAN_PASS);
while (WiFi.status() != WL_CONNECTED) {
delay(500);
Serial.print("not connected");
}
Serial.println();
Serial.println("WiFi connected");
Serial.println("IP address: "); Serial.println(WiFi.localIP());
// Setup MQTT subscription for onoff feed.
mqtt.subscribe(&FAN);
mqtt.subscribe(&MOTOR);
}
void loop() {
char buffer[80];
delay(10000);
MQTT_connect();
Adafruit_MQTT_Subscribe *subscription;
while ((subscription = mqtt.readSubscription(5000))) {
if (subscription == &FAN) {
//Serial.print(F("Got: "));
if(strcmp((char *)FAN.lastread,"1")){
Serial.println("Fan on");
}
else{
Serial.println("fan Off");
}
}
if (subscription == &MOTOR) {
//Serial.print(F("Got: "));
if(strcmp((char *)MOTOR.lastread,"1")){
Serial.println("motor on");
}
else{
Serial.println("motor off");
}
}
}
// Now we can publish stuff!
Serial.print(F("temperature value "));
Serial.println(dht.readTemperature());
//Serial.print("...");
if (!temperature.publish(dht.readTemperature())) {
Serial.println(F("Failed"));
} else {
//Serial.println(F("OK!"));
}
Serial.print(F("humidity value "));
Serial.println(dht.readHumidity());
//Serial.print("...");
if (!humidity.publish(dht.readHumidity())) {
Serial.println(F("Failed"));
} else {
//.println(F("OK!"));
}
Serial.println(F("moisture value "));
Serial.println(analogRead(sensorpin));
Serial.println(100-((analogRead(sensorpin)-256)/7.68));
//Serial.print("...");
if (!moisture.publish(100-((analogRead(sensorpin)-256)/7.68))) {
Serial.println(F("Failed"));
} else {
// Serial.println(F("OK!"));
}
Serial.println(F("Moisture switch "));
//Serial.println(analogRead(sensorpin));
//Serial.println(100-((analogRead(sensorpin)-256)/7.68));
//Serial.print("...");
if (!mswitch.publish((100-((analogRead(sensorpin)-256)/7.68))
< 50)) {
Serial.println(F("Failed"));
} else {
//Serial.println(F("OK!"));
}
Serial.println(F("Temperature switch"));
//Serial.println(analogRead(sensorpin));
//Serial.println(100-((analogRead(sensorpin)-256)/7.68));
Serial.print("...");
if (!tswitch.publish(dht.readTemperature()>30)) {
Serial.println(F("Failed"));
} else {
Serial.println(F("OK!"));
}
}
// ping the server to keep the mqtt connection alive
// NOT required if you are publishing once every KEEPALIVE seconds
void MQTT_connect() {
int8_t ret;
// Stop if already connected.
if (mqtt.connected()) {
return;
}
Serial.print("Connecting to MQTT... ");
uint8_t retries = 3;
while ((ret = mqtt.connect()) != 0) { // connect will return 0 for connected
Serial.println(mqtt.connectErrorString(ret));
Serial.println("Retrying MQTT connection in 5 seconds...");
mqtt.disconnect();
delay(5000); // wait 5 seconds
retries--;
if (retries == 0) {
// basically die and wait for WDT to reset me
while (1);
}
}
Serial.println("MQTT Connected!");
REFERENCE
Introduction to ArduinoIDE from www.theengineeringprojects.com
DHT11 Sensor from www.adafruit.com
Soil moisture sensor from Wikipedia